
What is Active Directory?
As always, let me start this with a general overview of what I worked on and made. Then, if you’re still interested, I’ll go into more detail on the exact steps I followed to make this project.
But first, Active Directory. If you dont know what it is, it can seem like a very intimidating phrase. Before I sat down and started researching it, I though it would take me weeks if not months to understand and build, with countless sleepless nights trying to get details working. Fortunately, like most things that seem intimidating, taking the first step was the hardest part.
Imagine a child named Adam trying to walk in to their friends house, but when he knocks on the front door, the child living there named Dave runs over to the door Adam knocked and askes “Who is it?”. Adam responds with his name. Dave then asks “What’s Adam’s password?”, which Adam reply’s “AtV3Y77C17$”. Dave confirms that that’s Adams password and lets him in.
The next day, Adam decides to come in through the back door. He knocks and Dave runs over and asks who it is and then asks for their password again. Adam answers both and gets let in. The next day Adam wanted to come in through the Garage, then the window, then the front door again. Each time Dave ran over and made sure that it was Adam before letting him in.
Now, imagine Dave has a hundred friends, with most of them coming over every day, knocking on different doors to get let in. Fortunately, Dave has a list of all of his friends he lets into his house. Once he asks for their name, he finds it on his list and asks for the password. As long as it matches, any of his friends can enter from any door they want, even if it’s their first time using the door.
Dave is essentially functioning as an Active Directory! The House is the Network where he lives, and the doors are the computers that people use to log in to the network.
If you are in a big, 10 story tall office, hopping between floors and signing into dozens of different computers, you dont want to spend the time making a user account for every single person on every single computer. That’s what makes Active Directory so great! All that IT would need to do is set it up on the network and add in all of their employees. Then anyone could log into any computer with their own credentials.
This is only the surface of what you can do! You can group the employees by departments and give only certain departments like IT access to every floor, while at the same time give the accounting department only permission to access computers on the 4th floor. You can give managers a higher permission set than the rest of their department. You can even remove someone’s credentials and stop them from logging into any computer on the Network.
Building My Own Active Directory Using Virtual Machines
Time to get into the details of how I built my own Active Directory, or AD for short. I won’t go into extensive detail on how I set up my own AD, mainly to avoid overloading readers with information, and also to keep this article at a reasonable length. However, I wanted to give a quick explanation of how Virtual Machines work. The name itself is pretty self-explanatory actually, Virtual Machines are a digital version of a physical computer. If you set up one on your computer, when you looked at it, you would see a window that you could resize like this one you are reading this on. But instead of a webpage, you would see another Desktop! Inside of it you can navigate and use it exactly like a normal computer.
This is a really great technology if, for example, you had a Mac but wanted to run a program that only worked on a Windows computer. You could boot up a Windows Virtual Machine and, exactly like you would a normal computer, you can install the program you want and use it with almost no restrictions.
We are going to be using 2 different Virtual Machines, or VM for short. One for the server that runs the AD, this is typically known as a Domain Controller which has a wide range of functions outside of Active Directory management. The other VM we will use to test logging in.
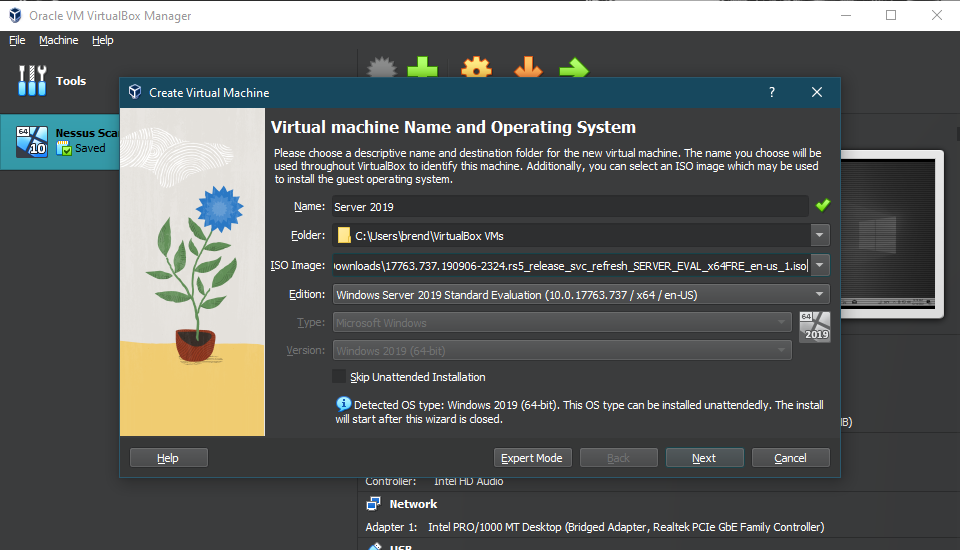
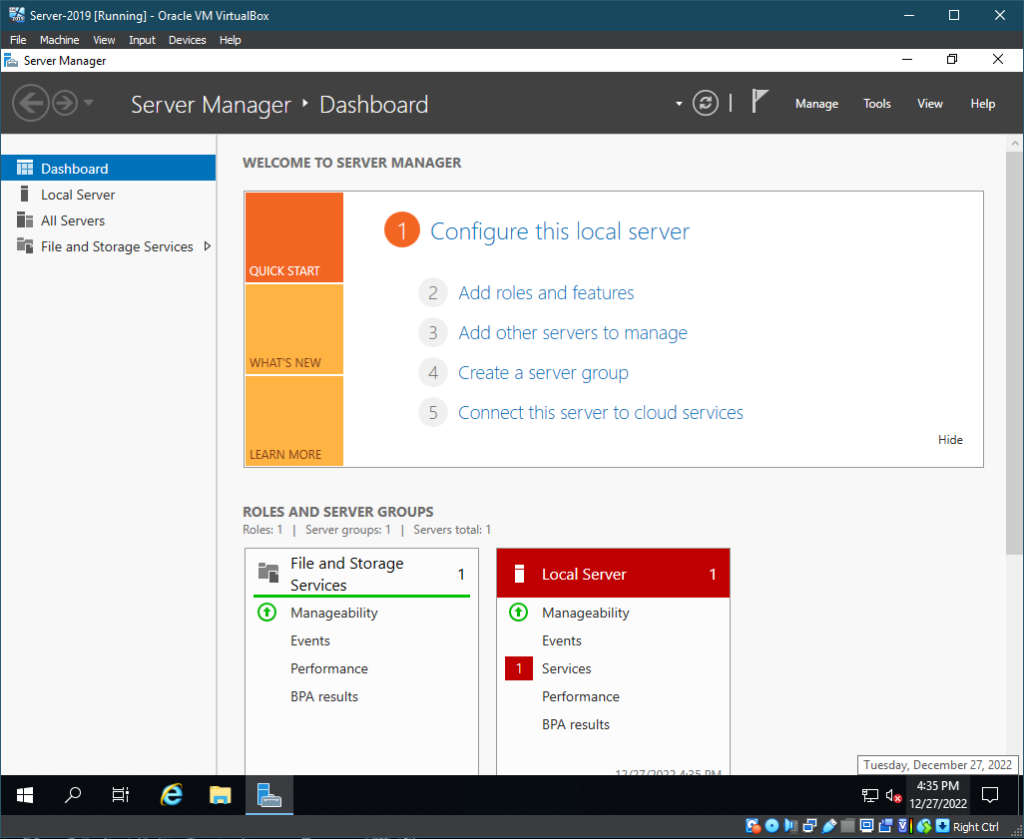
Firstly, we need to create the Server VM. From Microsoft’s website, I was able to download what we needed to install in the VM software, called “Windows Server 2019”. Installing that and booting up the VM, we are instantly shown the Server Manager software. This is where we will be doing most of our setup!
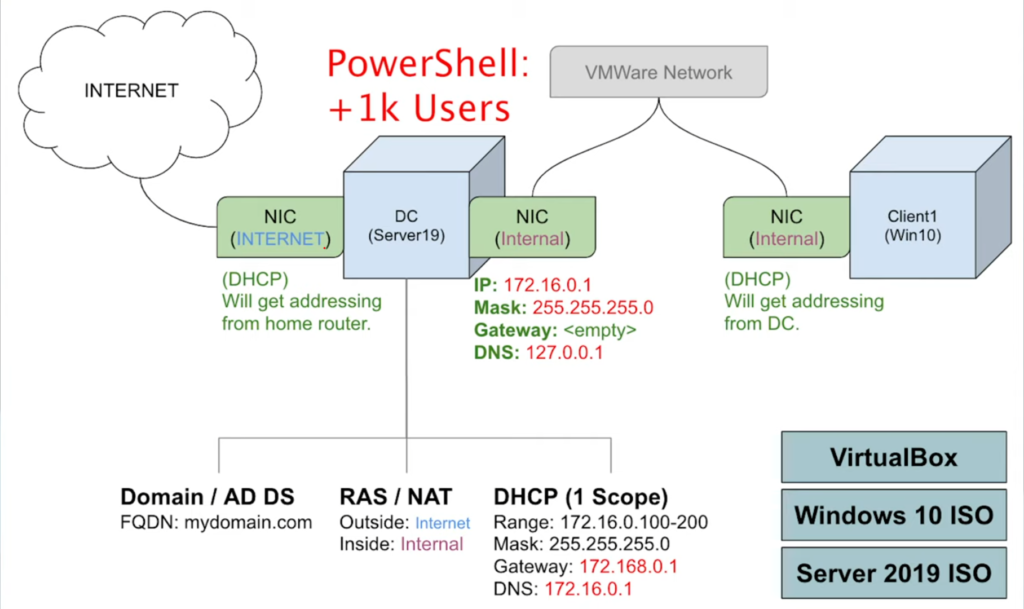
Since I am starting from scratch, and I’m not setting up my AD on an already established network, I am going to need to do a few extra things to get everything up and running. However, it’s a bit outside of the scope of this article, but I’ll give a quick explanation still if you are interested. To get the Domain Controller up and running we will need to:
- Configure Two Network Interface Card (NIC)Adapters: Picture the Domain Controller sitting between the Internet and our Network. We need to have one of these NIC Adapters pointed at the Internet, and a second one pointed at our network. This just lets any of our network computers access the internet, they just need to pass through our Domain Controller. (For anyone who cares, our internal NIC adapters IP address is set to 172.16.0.1)
- Establish A Domain For The Network: Domains can also sound really intimidating if you hear them thrown around in a conversation. But, basically all a Domain is is the name of your Network, for example I just used the name “mydomain.com”. Every computer, printer, and Smart Fridge that you have on your network can be included in your Domain. You might have guessed, but the Domain Controller is used to establish the Domain name of your network.
- Install a Dynamic Host Configuration Protocol (DHCP) Server: This has to do with IP Addresses again, which can get very complicated very quickly. Basically all a DHCP Server does is hand out IP Addresses to each device on it’s Domain, like to computers and the aforementioned Smart Fridge, so it can know where that device is. Think of it like a Home Address. For example, if a printer joins the Domain, the DHCP server can give it an IP Address like 172.16.0.150. Then later if a computer needs to know where that printer is, the DHCP Server will respond “Oh the printer? It’s located at 172.16.0.150” (Also for anyone that cares, the subnet range is 172.16.0.100-200 and the subnet mask is 255.255.255.0)
- Setup Network Address Translation (NAT): Again, can be very complicated when going into details. But basically NAT is responsible for converting network activity to internet activity. For example if someone on the Domain wanted to go to Google.com on their computer, the request would go from their computer, to the Domain Controller, where the request would then go through the NAT process, and then be sent over the internet to find Google.com. After it reaches Google.com, the exact opposite happens and it comes back to the Domain Controller, NAT turns it back into something the Network can use, and sends it back to your computer, and then you see Google.com.
Adding Over A Thousand Users!
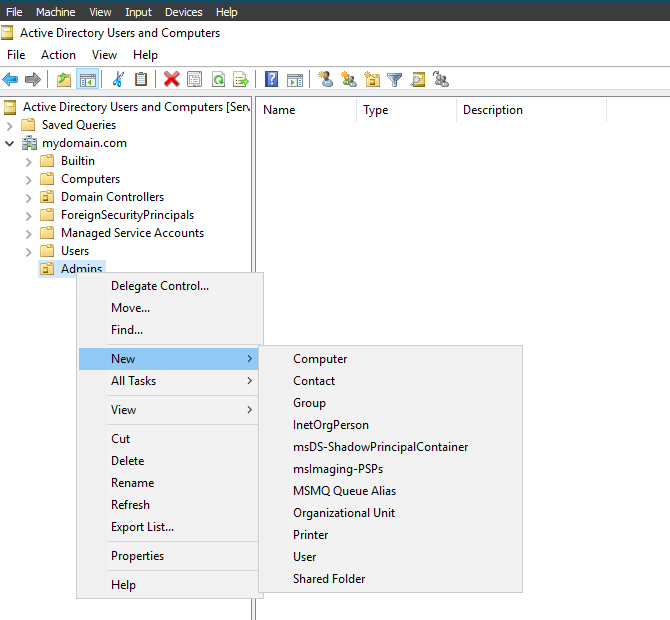
It can be a bit difficult at first to find how to add a new user, but once you add one in you can make another thousand if you wanted. All I needed to do is click on the Windows Search Bar and search “Active Directory Users and Computers”. Once there I went to mydomain.com > Right Clicked on Users > New > User. I then was asked all of the information about the new user like their Name, Username, and Password. Then after that they were added to the Domain! Now what if I actually wanted to actually add in a thousand people? It is a fairly common task in most larger companies, but do they really make someone sit down and add in everyone in a 1,000+ sized company individually? Fortunately for thousands of IT departments, there is a way to automate this process!
Windows PowerShell is a coding language used to automate tasks in windows, such as gathering Log Events or restarting a computer at a certain time each week. As you can probably guess, another use for PowerShell is to automatically add users into a Domain. I’ll include a picture of the PowerShell code later on here, but essentially what the code does is that it takes a list of names (My list was randomly generated and placed in a text file) and creates a username using their first name’s initial and all of their last name. For example my username would be bzeman. Additionally, while not exactly secure, the password is just going to be set to “Password1” for everyone, Just because this is only a testing environment. And then after a few more minor tweaks it’s added in automatically!
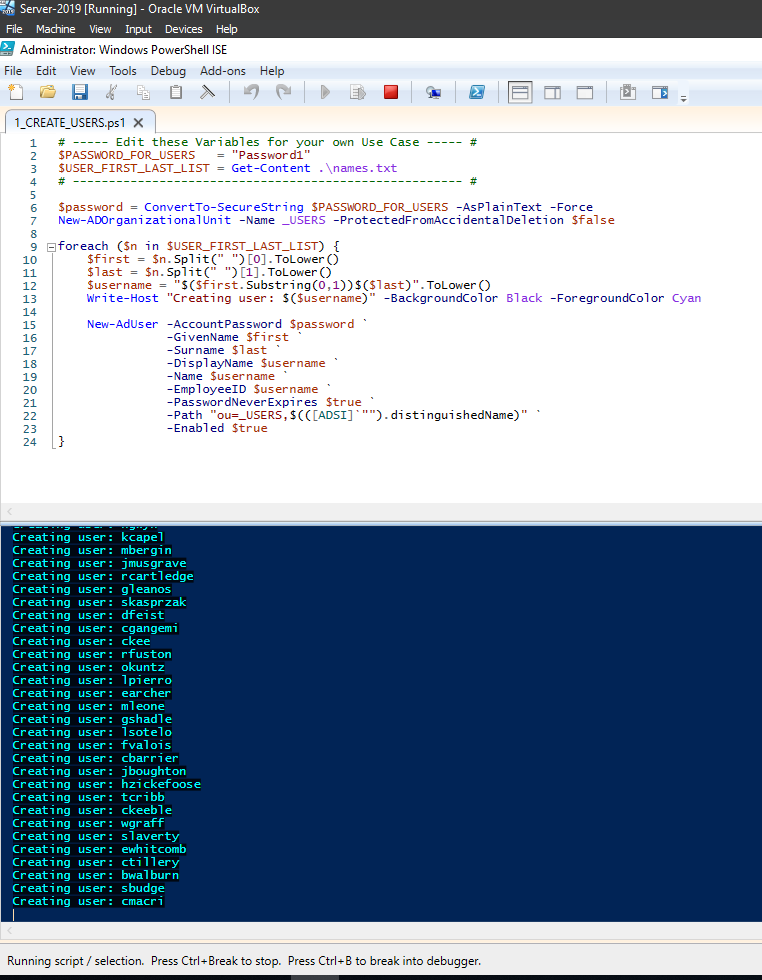
And with the click of a button, over a thousand users have been created on this Domain (In all honesty, it is exactly 1,001 users. “Over A Thousand!” just makes a better title). But now what can we do with it? This is where that second VM that I mentioned earlier comes in. We can make a second Windows VM and add it to the Domain we created, then we can log in using any of the Thousand accounts we created to log in. We can even have both VM’s open at once and see it assign an IP address and connect to the Domain in real time!
Creating the Client Virtual Machine
Alright, so almost the exact same configuration process is what were going to do for making the client VM. Once we boot it up were are greeted with a pretty basic windows desktop.
Now, the process for adding this new computer to the Domain is a little bit hard to find. But again, once you know where it is, it’s pretty easy to replicate. All you need to do is search “System Properties” and click Change under the Computer Name tab. After that you have an option to include the computer in a Workgroup or a Domain. For my setup I input my Domain’s name “mydomain.com” into the box. Once I input my Domain credentials, this computer officially joined mydomain.com! Now I completely understand if that was a bit hard to follow, I’ve included a picture below to help show the different windows I was working with to add this VM to the Domain
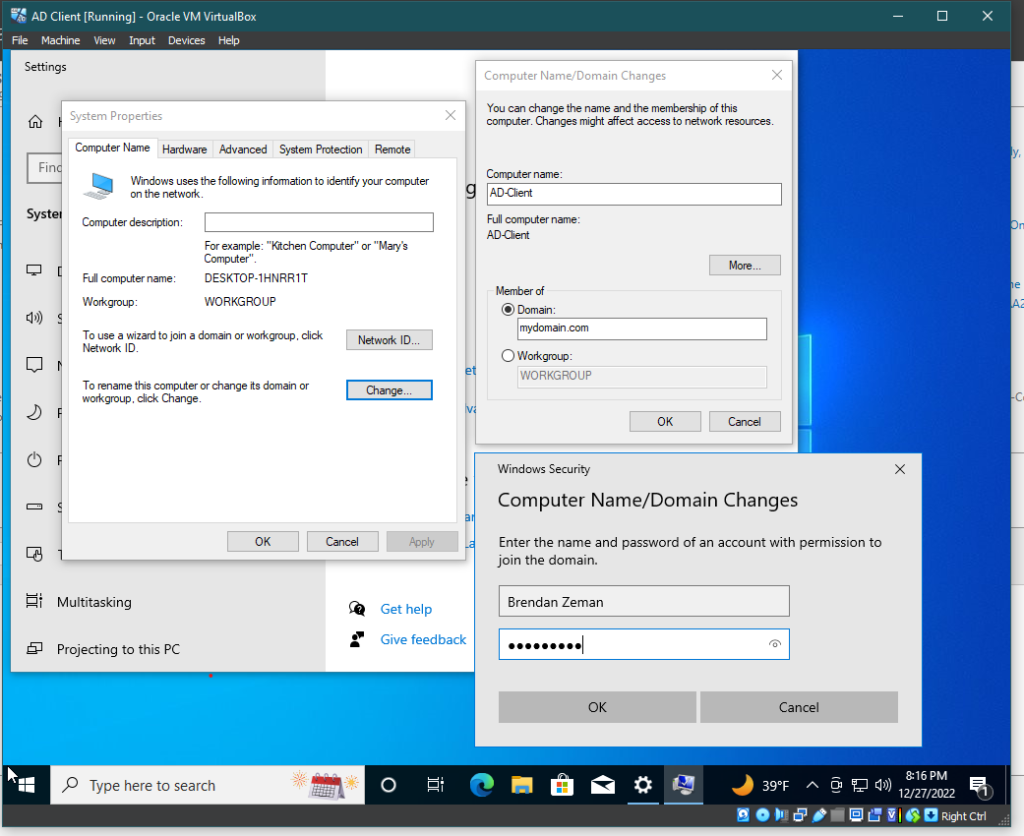
And now, if we go back to the Domain Controller, we can see that the it’s shown up in the DHCP Server, and the computer name is showing up as well. Confirming that the Domain Controller and the Client are connected! I can log in with any of the 1,001 users I added and use the computer like normal.
My Thoughts On This Project:
This was actually my first experience doing more than just poking around inside of Windows Server 2019. On top of that, even though I was very familiar with DHCP and Domains, I’ve only ever worked with already configured ones. I’ve never been able to set one up from scratch, so it was honestly really insightful getting to set up an entire Active Directory Domain Controller from a clean install.
That being said, I feel a little underwhelmed. But I think that that may be partially because of how interesting I found my Azure Sentinel Project. From start to finish I was learning a new technology and in the end I had a world map of Tens of Thousands of real cyber attacks on a system I made! Compared to that, My Active Directory Domain Controller seemed Lack-Luster. That being said, I know that I am just scratching the surface of what I can do in Windows Server, so I certainly want to go back to this and see just how complex I can make my Lab Environment.