Your computer remembers everything that you do. From turning it on and off, to what games you might have been playing, to that time that it didn’t let you log in because Num Lock was turned off and it didn’t add your birth year at the end of your password. Almost every action that you take is stored in what’s called a Log File on your computer, and Event Viewer is what’s used to organize those logs into something that we can easily read.
That Login Failure is actually what this article is mostly focused on, but not when YOU are trying to log into your own computer. This article is focused on people that you didn’t give permission to trying to log in to your computer; sometimes from the other side of the Earth! If you are interested in a quick explanation on how people up to no good are trying to log in to the computer in your own home, and how to prevent them from doing it, keep reading and I’ll give you a quick explanation.
After that, if you are really interested, I am going to go in detail on the process of making this project following these steps:
- Making My Computer Vulnerable To Attacks From Hackers
- Used a PowerShell Script to extract the IP address from the log events
- Running The IP Address Through An Application Programming Interface (API) To Get the Geolocation Of The IP
- Using Azure’s Log Analytics Workspace To Transfer the Logs From The Cloud Computer To Azure
- Using Azure’s Artificial Intelligence to Analyze The Custom Log Events Generated by the Cloud Computer
- Using Azure’s S.I.E.M. Known as Sentinel To Interpret the Data and Plot The Origin On A World Map
A Quick Overview for Everyone!
How complicated is your password? Is it as simple as “P@$$w0rd” or is it really compilated like “DFR3GgEgJU7RFFF23”? Hopefully after reading this you might make yours more complicated if you’re the former.
Computers have a large number of ways to communicate with each other. One commonly known method is HTTPS, you might also know this was the World Wide Web. What we are focusing on in this article is a communication process known as Remote Desktop Protocol, this allows someone to log into another computer as long as they have a valid Username, Password, and IP address for the computer. This is normally used by IT at a large company with hundreds of computers so they can log in remotely and make changes without leaving their own computer.
Hackers however, have programs that they have made, to scan all over the internet and look for computers that they can try to remotely log into, and guess the login using commonly used credentials, for example “P@$$w0rd”. And if they can log into your computer, that pretty much means that they won; they can see everything that you do and steal whatever they want.
Now, of course, I’m sure that you would like to know how to protect yourself from these attacks. Step one is to MAKE SURE THAT YOU HAVE A STRONG PASSWORD, these Hackers usually have a list of common passwords that they run through, so if your password isn’t on that list, then you are less likely to be a victim. Another tip for Windows users: make sure that you have Windows Defender enabled, this is a great security measure that does a lot of things that keeps your computer protected. One great example being that hackers will have their computers send out a general message asking other computers “Is anyone out there?”. If Windows Defender is disabled then your computer will respond with saying “Yeah, I am right here!” and once the hackers know that your computer is there, they can begin trying to break in. Having Windows Defender turned on will stop your computer from responding and make sure that the Hackers don’t know that your computer is there.
Knowing all of this, I purposely turned off Windows Defender on a computer I owned and waited for hackers to find it. These attempts to log in and the IP addresses of the attacker are saved in the Log Files I mentioned earlier. Much like a Country Code or an Area Code on a Phone Number, IP addresses have a set region they are assigned to. So if you have an IP address, you can narrow down the general location of the computer who it belongs to.
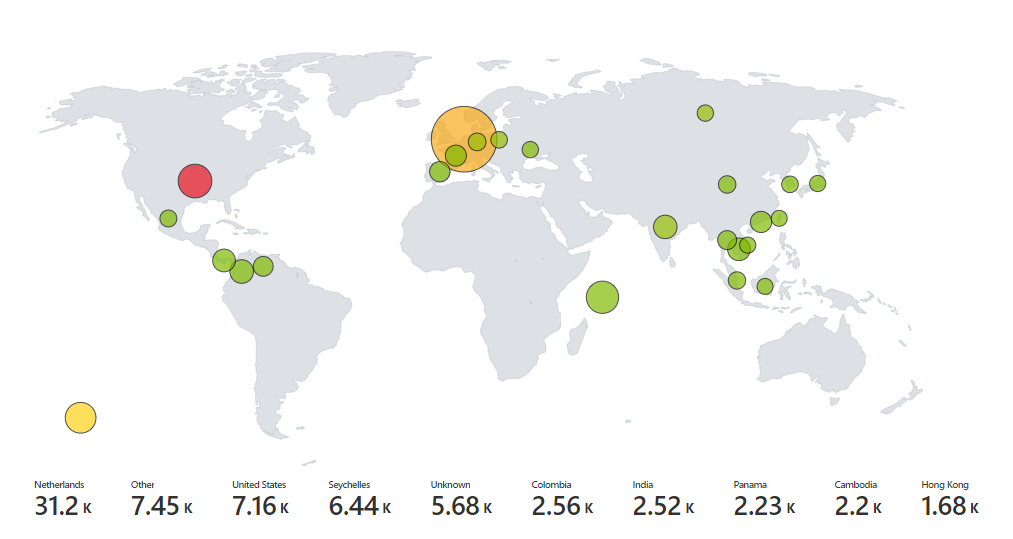
I set up a system to search the IP address in the Log Files for each failed log in attempt, get the region it is from, and plot that on a map. The result is the image you saw above, with the larger the dot meaning there are more attacks from that region. Additionally, the dots in the ocean are most likely caused by the attackers using fake IP addresses to try to mask their identity.
In Depth Microsoft Azure SIEM Lab
If you’re still interested in how I made the above map, then GREAT! I’d love to explain. Just as a warning, I will be speaking a bit more of a technical sense. However please don’t let that discourage you, I will do my best to be as clear as possible.
Step 1: Making My Computer Vulnerable To Attacks From Hackers
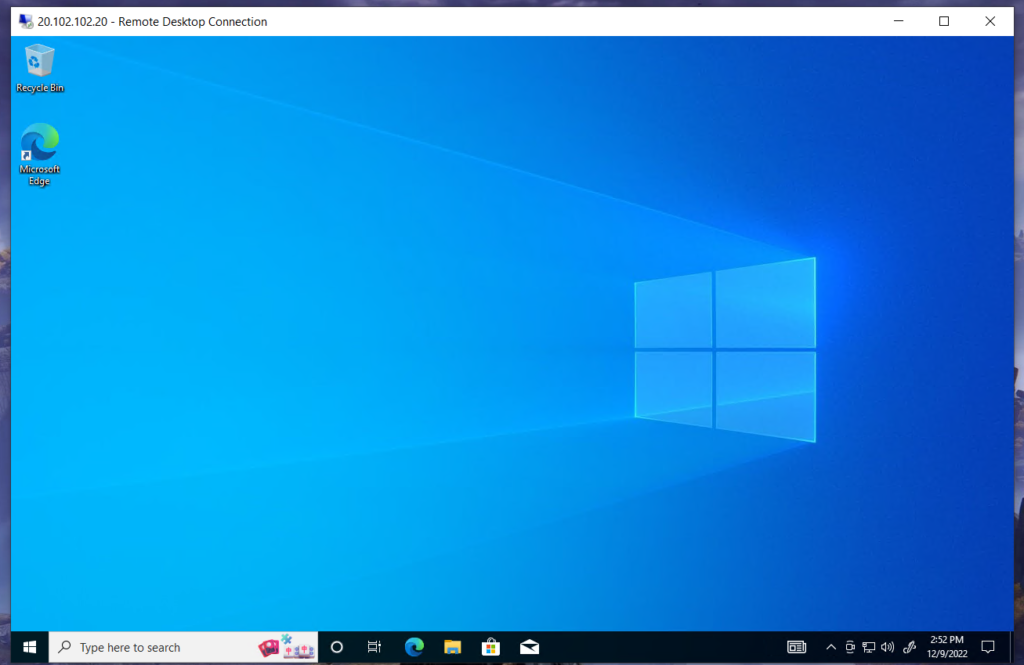
Firstly, even if you are confident with your strong password, it’s still a really bad idea to turn off Windows Defender. As stated, it does a lot to keep your computer safe. This is one of the reasons I chose to use Microsoft’s Cloud hosting service Azure. On top of it having a plethora of great features that will be used in this project, it also is able to create virtual computers in the cloud. The reason that this is so great is because for the most part, computers in the cloud are their own isolated systems. So if actually able to break in, they can’t do any actual damage to my home computer. Aside from the the program I have running to make the log events, this computer is a blank slate with none of my actual data on it.
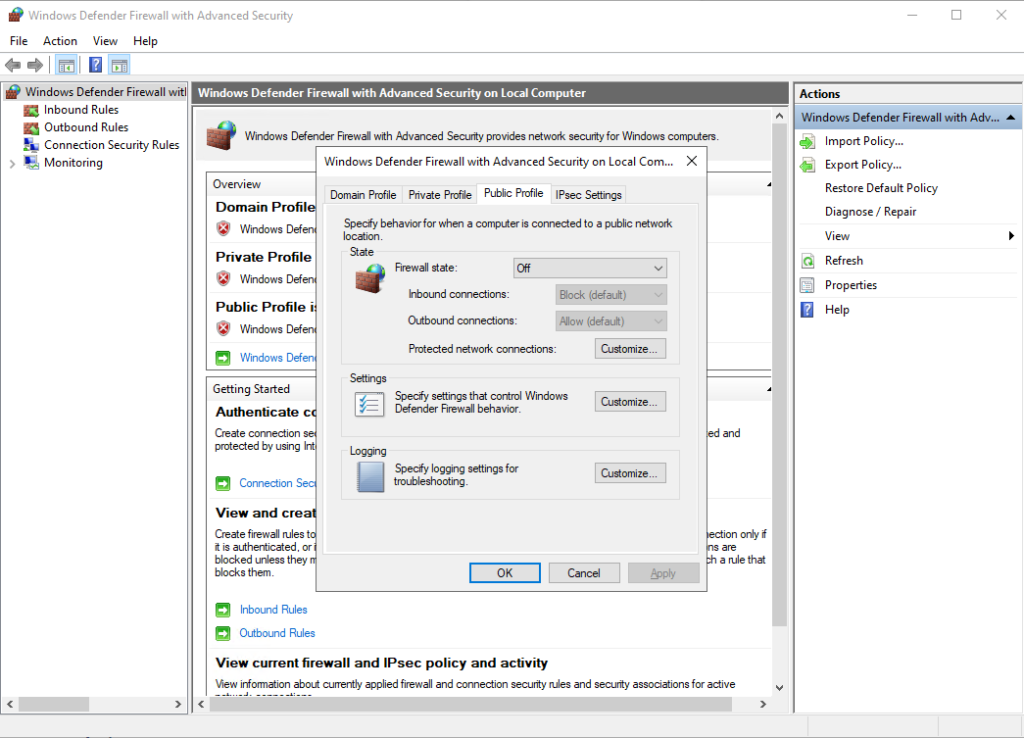
And with this failsafe in mind, I created my virtual computer in Azure and disabled Windows Defender, making its presence known to the world.
Step 2: Using a PowerShell Script to Extract Failed Login Events from the Log Events
Going back to what I said about Event Viewer keeping track of everything, I should specify that it also has a specific Event ID that is used for each type of event. For example, the Event ID for a failed Remote Desktop Login is 4625. I was able to use Windows PowerShell, which is just a premade script of command line instructions, to look through all of the Event ID’s for 4625, and extract the IP Address from them.
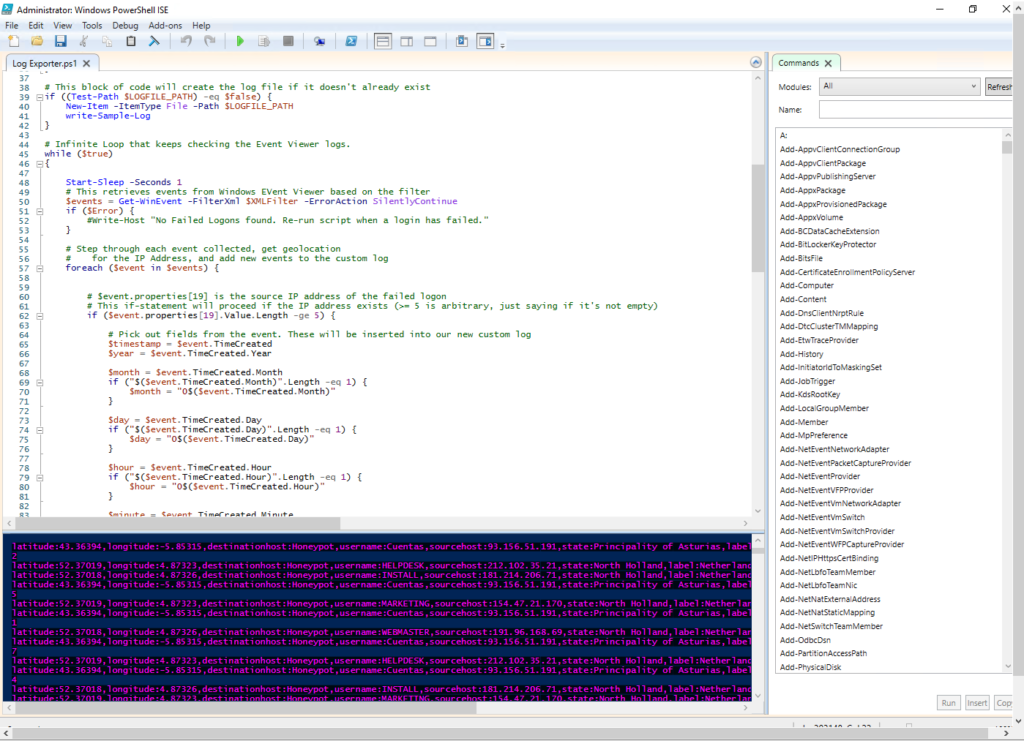
Step 3: Running The IP Address Through An Application Programming Interface (API) To Get the Geolocation Of The IP
With the extracted IP address, the PowerShell sent it to ipgeolocation.io. This is a website that you can send data to through a program and receive data back, without ever having to go to the website, this is also known as an API website. For example, it could take an IP address like this “185.190.24.45” and turn it into this:
latitude:11.56887,longitude:104.89302,destinationhost:Honeypot,username:ADMINISTRATOR,sourcehost:185.190.24.45,state:Phnom Penh, country:Cambodia,label:Cambodia – 185.190.24.45,timestamp:2022-12-12 12:10:23
Feel free to try it out for yourself by following the above link!
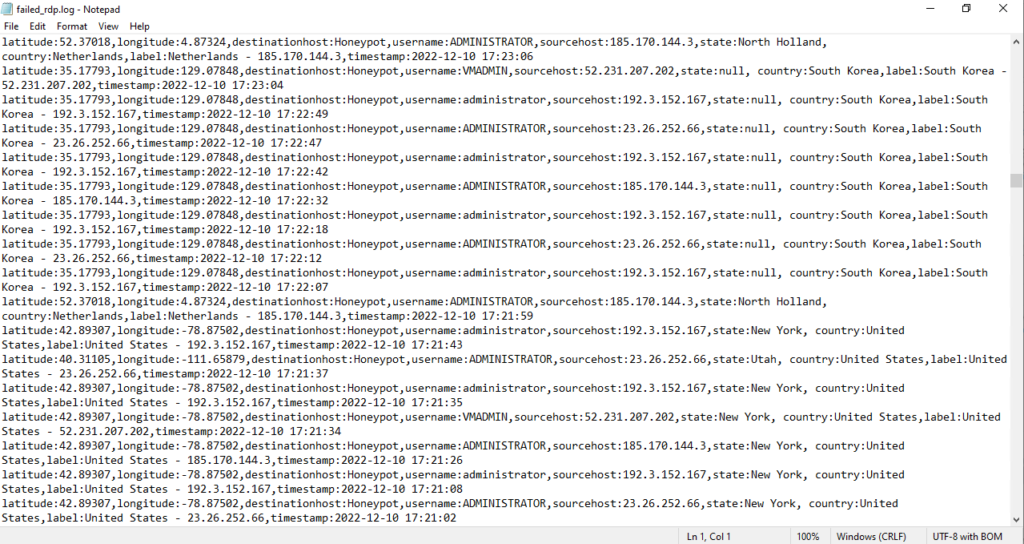
Once the PowerShell receives back the Geolocation of the IP address, it creates its own custom Log File on the computer that we can have Azure search for and extract the logs for us to use in its own Log Analytics Workspace.
Step 4: Using Azure’s Log Analytics Workspace To Transfer the Logs From The Cloud Computer To Azure
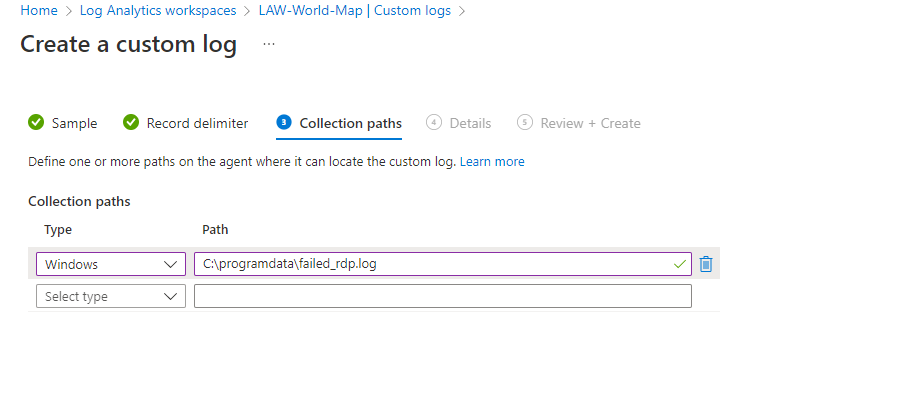
This step is when we can start using Microsoft Azure to its fullest, outside of just hosting computers in the cloud. In Azure’s Log Analytics Workspace, it is fairly easy to transfer over the normal system logs from Event Viewer, but with the logs that we are trying to transfer, Azure cant read them by default. Thankfully, Azure has a system to input custom event logs that we can still use to extract them, we just need to tell Azure where the log files are stored.
Step 5: Using Azure’s Built in Artificial Intelligence to Analyze The Custom Log Events Generated by the Cloud Computer
Now we can start putting all of the data we got from the log events to use. By default, Azure just reads these log events as “Raw Data”. It knows the exact letters and numbers that are in the logs, but it has no idea what they mean or how to know when one data point ends and the next begins. We can teach Azures built in Artificial Intelligence (A.I.) what to call these data points and how to recognize them.
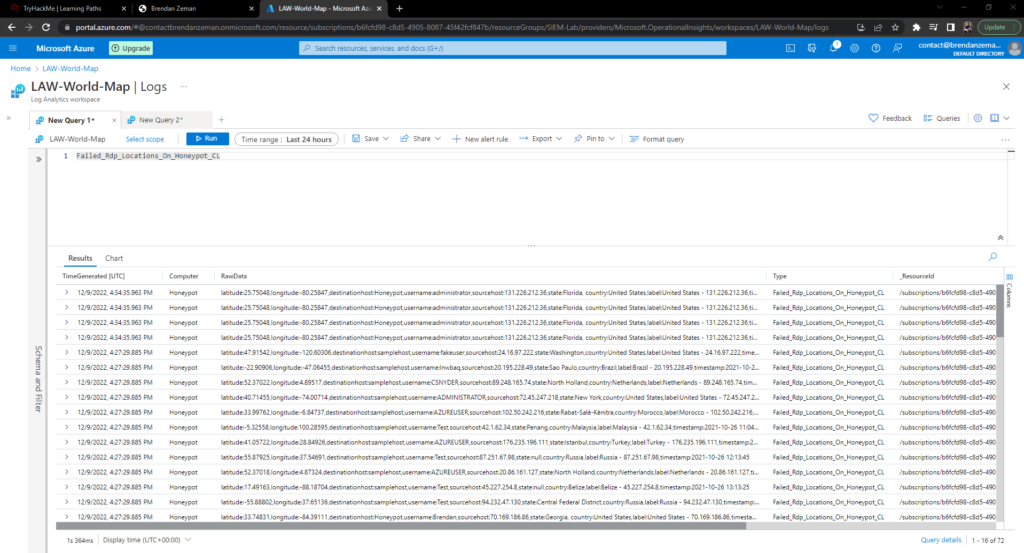
For example, if I wanted to teach Azure how to extract the Country from the data. I would need to highlight the just the portion of the data that is the country, not the label “country” here is that same Raw log file we saw earlier. However, I made bold and underlined the part of the log that I would need to highlight to show Azure where to find the Country:
latitude:11.56887,longitude:104.89302,destinationhost:Honeypot,username:ADMINISTRATOR,sourcehost:185.190.24.45,state:Phnom Penh, country:Cambodia,label:Cambodia – 185.190.24.45,timestamp:2022-12-12 12:10:23
After that, I am provided a large number of other log events that Azure has attempted to guess the Country from the Raw Data. I need to scan through it, and correct any entries that Azure may have guessed incorrectly. It then recalibrates its guesses and I go down the list again until everything looks correct.
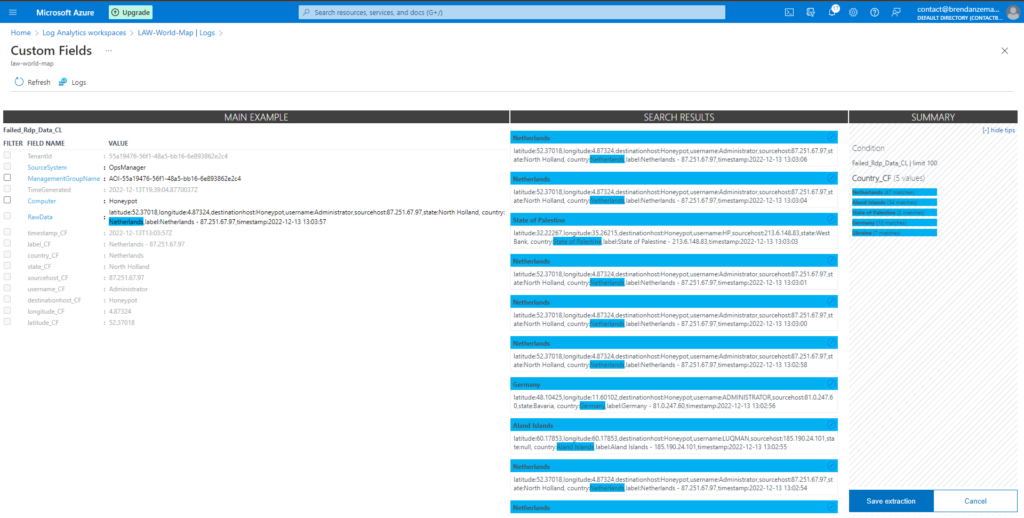
Step 6: Using Azure’s Built in S.I.E.M. Known as Sentinel To Interpret the Data and Plot The Origin On A World Map
Finally, I am able to use the data from the Hackers login attempts all around the world to be able to map out on a World Map where they were attacking from. I was able to train the A.I. to sort through each log and extract the Latitude, Longitude, Username they tried to log in with, the Hacker’s IP, State, Country, and the time that they tried to log in.
This final step is going to be done through Azure’s Built in S.I.E.M. Known as Sentinel. A S.I.E.M. by definition stands for Security Information and Event Management. It lets people that are in charge of monitoring a large number of computers combine all of the logs from the computers and sort through them to find the information that the are looking for. S.I.E.M.’s are a very important tool in the field of cybersecurity because it lets people navigate through a countless number of logs from every computer under their protection, to find oddities that may lead them to discovering a cyber attack.
In regards to using Sentinel for this project, there are two different ways I can plot out the information. The first is by using the exact Latitude and Longitude of the IP Address, and the other is by generalizing to the center of the country. As much as I would like to use the exact Latitude and Longitude, I will unfortunately need to go by country location. The reason being is that while the A.I. is extremely impressive, it unfortunately does not seem to read the longitude coordinate correctly sometimes, for example missing a negative sign. This can make it seem like the attack is coming from the middle of the ocean, and just makes the chart loose some validity. However with over 200 countries, there will still be plenty of information to work with for the final product
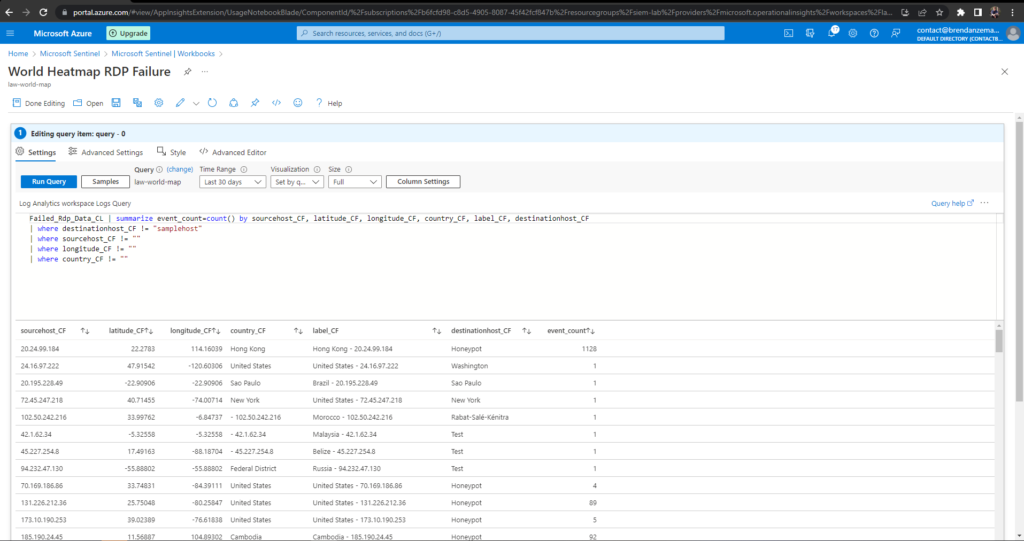
All of the data that we need is currently stored in an organized list in the Log Analytics Workspace. We will need to call the data from that location using the code below. Essentially, the code is asking for every Log Event stored in the list I made that does not have any errors, such as missing the country or IP address, and then I have it outputting that information on the Map that is set up to place a dot over each country that has a data point. The larger the dot, the more attacks originated from that location. With that, we have the final result below!
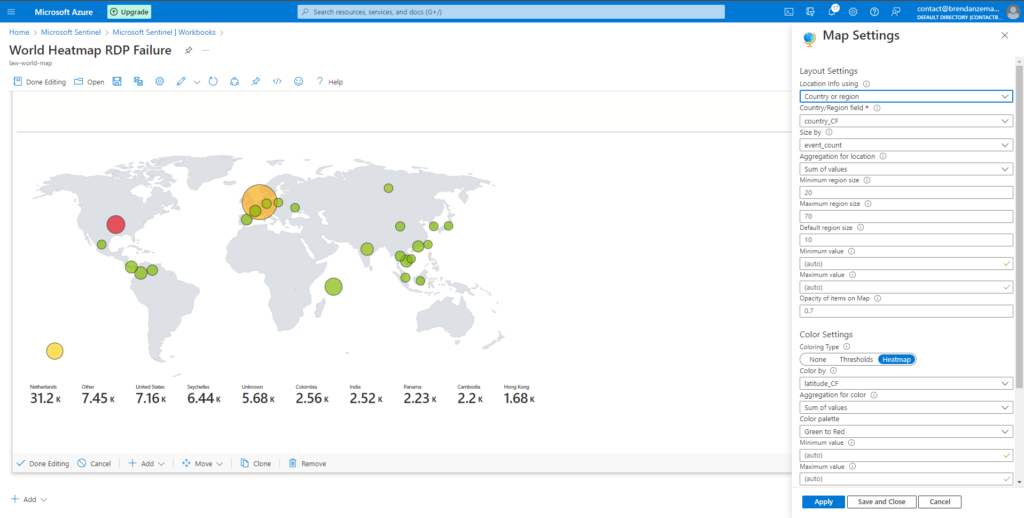
Closing Notes
Thank you for taking the time to read through this. This project was incredibly interesting and really helped me depen my understanding of Microsoft Azure outside of just a virtual machine cloud provider. I have heard of many companies moving their networks entirely to the cloud and after seeing the utility that Azure had I can completely understand why.
But anyways, I hope you found reading through this project as interesting as I did while I was working on it. Or at least I hope that you learned something new out of this. I tried to format it so that I built up to the more complicated information in a way that was easy to understand, even for people that don’t know that much about computers. If you are still confused or have any questions about this lab and want me to explain something, or if you simply would like to reach out and contact me, feel free to email me at contact@brendanzeman.com.